
- Before You Start
- Opening the Add-in
- Filing an Email to a Matter
- Filing Several Emails at Once
- Filing Emails You Have Sent
- Opening the Add-in Settings
- Turning on Prompt to File
- Delegate Filing
- Mapping Outlook Folders to NetDocuments
- Seeing What Has Been Filed
- Attaching Documents from NetDocuments
- Limiting Who Can See an Email
- Saving Attachments Separately
- Tips for Getting the Most Out of ndMail
- Need Help with ndMail?
Category: ndMail (Email Filing)
ndMail for Microsoft 365 is the NetDocuments add-in for Outlook. It lets you file emails to the right matter, attach documents from NetDocuments, send and file in one step, and link Outlook folders to matters, all without leaving your inbox. Because it is a Microsoft 365 add-in, it works the same way in classic Outlook, the new Outlook, Outlook on the web, Outlook for Mac and the Outlook mobile app.
This article walks through the everyday tasks. If you are not sure which version of ndMail your firm uses, see ndMail for Outlook (Classic) vs. ndMail for M365.
Before You Start #
- The add-in is usually deployed to everyone at once by your firm’s Microsoft 365 administrator, so there is nothing to install on your computer.
- The email address you use in Outlook needs to match the email address on your NetDocuments account. If they do not match, the add-in will not be able to sign you in.
- The first time you open the add-in, you will be asked to sign in to NetDocuments. For Canadian firms, make sure you are signing in to the Canadian NetDocuments service.
Opening the Add-in #
Select an email, then click the NetDocuments button in the Outlook ribbon. In the new Outlook and Outlook on the web, the button may sit under the Apps button or the … (more actions) menu. The add-in opens as a panel on the right side of the email.
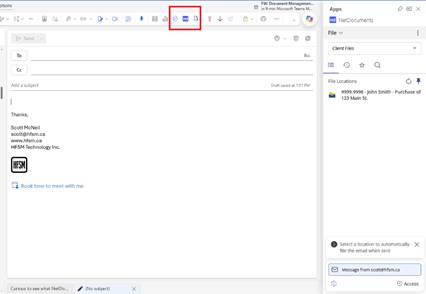
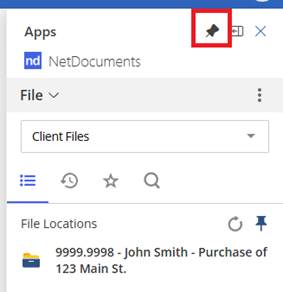
If you use it often, pin the button to the ribbon so it is always one click away.
Filing an Email to a Matter #
- Select the email you want to file.
- Click the NetDocuments button to open the add-in.
- Review the list of suggested locations at the top. These predictions are based on where you and your colleagues have filed similar emails, and they get better the more you use the add-in.
- If the matter you need is not listed, use the search box to find the workspace or folder.
- Select the location and click File.
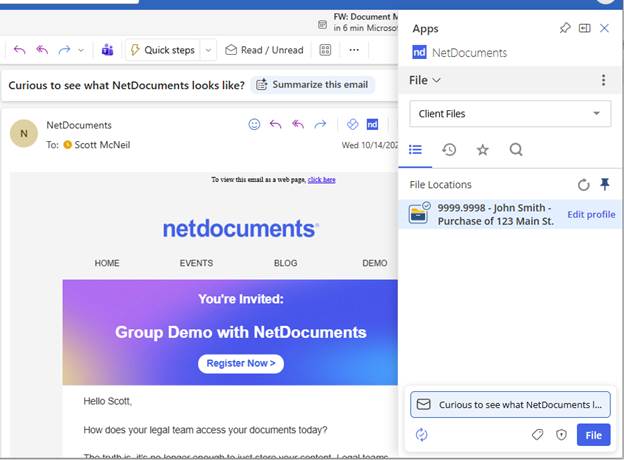
Filing runs in the background, so you can move on to the next email right away. When you select an email that has already been filed, the add-in shows you where it was saved.
Filing Several Emails at Once #
Select multiple emails in your inbox (hold Ctrl on Windows or Command on a Mac and click each one), open the add-in, choose the location and click File. This is a quick way to catch up on a matter after a busy day.
Filing Emails You Have Sent #
There are two ways to make sure your outgoing emails end up with the matter:
- Send and File: while writing a new email, reply or forward, open the add-in and choose a filing location before you click Send. The email is filed automatically as soon as it is sent.
- After the fact: go to your Sent Items folder, select the email and file it the same way as any other email.
Filing both sides of the conversation keeps the full history in one place for everyone working on the matter.
Opening the Add-in Settings #
Prompt to File, delegates and folder mapping are all managed from the add-in settings. To get there:
- Select any email and click the NetDocuments button to open the add-in.
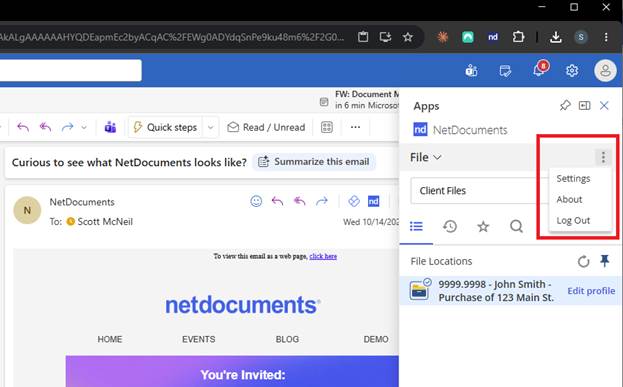
- Click the … (more options) menu at the top of the add-in panel.
- Select Settings.
Turning on Prompt to File #
The add-in can remind you to choose a filing location before an email goes out. To turn it on:
- Open the add-in settings as described above.
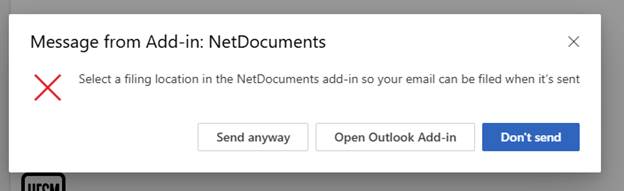
- Turn on Prompt to File.
- Close the settings panel. The change takes effect right away.
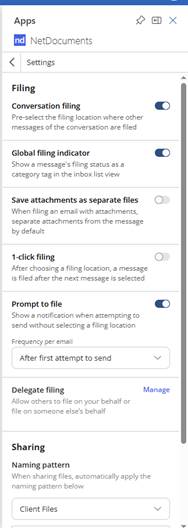
Now when you click Send without picking a location, Outlook shows a reminder. You can open the add-in and file the email, or carry on and send it without filing.
Tip: if your computer also has the classic ndMail program installed, turn on the prompt in only one of the two tools. Having it on in both will give you two reminders for every email.
Delegate Filing #
Assistants and clerks often file email on behalf of a lawyer. The add-in supports this through delegation, so a delegate can open the lawyer’s mailbox in Outlook and file emails from it to NetDocuments.
Delegation works in two parts, and the Outlook part has to come first:
- Give delegate access in Outlook. The lawyer (or IT) grants the assistant delegate access to their mailbox in Outlook. This is a Microsoft setting and is done entirely outside of NetDocuments.
- Add the delegate in the add-in. Open the add-in settings, scroll down to Delegate filing and click Manage. On the Delegate filing screen, click New Delegate and add the person who will be filing on your behalf.
The Delegate filing screen is split into two lists:
- Access granted to: people you have allowed to file emails on your behalf.
- Granted access by: people who have allowed you to file emails on their behalf.
If you have not set up any delegates yet, you may see a message saying the add-in is unable to retrieve delegate information. This is expected, so you can go ahead and click New Delegate. If you do have delegates and still see this message, sign out of the add-in and sign back in to retry.
Managing Delegate Access #
You can review who is set up as a delegate at any time by opening the add-in settings and clicking Manage next to Delegate filing. When someone changes roles or leaves the firm, remove them there and also remove their delegate access in Outlook so both sides stay in step.
Mapping Outlook Folders to NetDocuments #
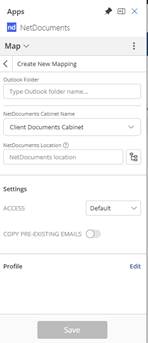
Folder mapping links an Outlook folder to a matter workspace or folder in NetDocuments. Once it is set up, any email you drag into that Outlook folder is filed to the matching NetDocuments location automatically. Many lawyers like this because it fits the way they already organize their inbox.
Step 1: Create the Outlook Folder #
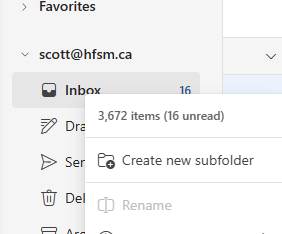
Start in Outlook. Right click your inbox (or another folder) and choose New Folder in classic Outlook, or Create new subfolder in the new Outlook and Outlook on the web. Give it a name that matches the matter, such as the client and matter number, so it is easy to find later.
Step 2: Link the Folder in the Add-in #
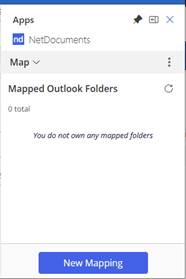
- Open the add-in and go to the Map section.
- Select the Outlook folder you just created.
- Search for and select the NetDocuments workspace or folder you want to link it to.
- Save the mapping.
Step 3: Drag Emails In #
From now on, dragging or moving an email into the mapped Outlook folder files it to NetDocuments. You can also set up an Outlook rule to move emails from a client into that folder, so they are filed without any extra clicks.
Seeing What Has Been Filed #
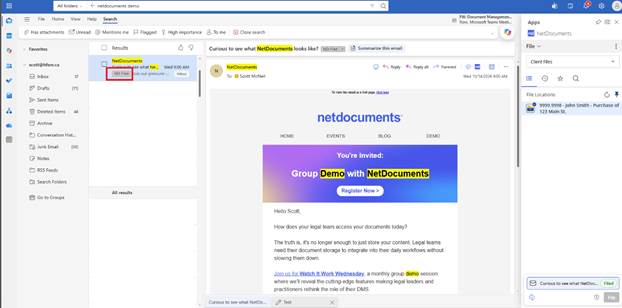
Once an email is filed, Outlook tags it with an ND Filed category. This makes it easy to see at a glance which emails are done. You can also build an Outlook rule that uses this category to move filed emails out of your inbox automatically, which keeps your inbox focused on what still needs attention.
Attaching Documents from NetDocuments #
When writing an email, open the add-in to browse your recent documents and favourites, or search NetDocuments directly. You can then:
- Attach a copy of the document
- Insert a link to the document for people inside the firm
- Send a secured link for people outside the firm
- Convert attachments to PDF, and rename or reorder them before sending
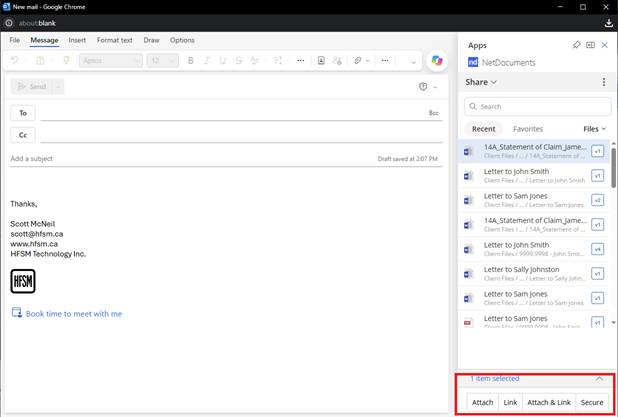
Sending links instead of copies means everyone is looking at the current version and there are fewer copies sitting in inboxes.
Limiting Who Can See an Email #
Some emails are sensitive even within a matter. Before filing, you can change the access so that only the internal sender and internal recipients can see the email in NetDocuments. Look for the Access option in the add-in before clicking File.
Saving Attachments Separately #
By default, the add-in files an email together with its attachments. If you would rather save the attachments as their own documents in NetDocuments, you can split them out before filing:
- Select the email and open the add-in.
- At the bottom of the panel, click the expand button to the right of the email (beside the pencil icon) to show the email and each of its attachments as separate items.
- Click each item you want to save so it is highlighted in blue. You can choose just the email, just the attachments, or any combination.
- Choose the filing location and click File.
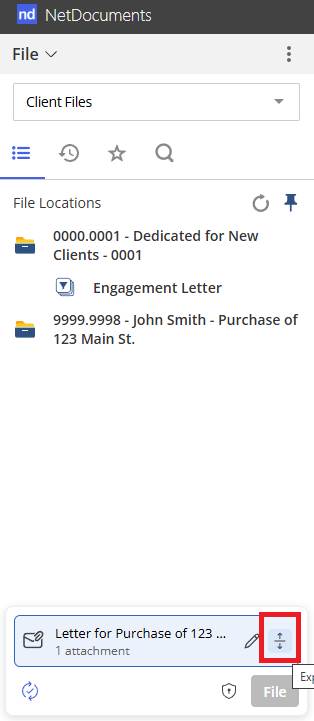
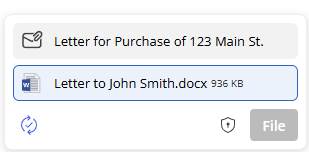
Tip: if you usually want attachments saved on their own, turn on Save attachments as separate files in the add-in settings so they are split out by default.
Tips for Getting the Most Out of ndMail #
- File consistently for the first couple of weeks so the predictions have something to learn from.
- Check the suggested locations before searching. The right matter is usually already there.
- File sent emails too, using Send and File where you can.
- Use the ND Filed category with an Outlook rule to keep your inbox tidy.
- Map Outlook folders for busy matters so filing happens as you organize your inbox.
- Send links to NetDocuments documents instead of attaching copies whenever possible.
Need Help with ndMail? #
HFSM Technology helps Canadian law firms set up and get more out of NetDocuments, including rolling out ndMail for Microsoft 365, training staff and building filing habits that stick. If your firm would like a hand, get in touch with HFSM Technology.


