Category: Working with NetDocuments
Once ndOffice is installed and connected on your PC, saving documents to NetDocuments works directly from within Microsoft Word, Excel, and PowerPoint. You do not need to upload files through the web interface or drag them into a browser window. Everything happens from the familiar Save and Save As commands you already use.
How Saving Works with ndOffice #
When you open a document from NetDocuments using ndOffice, it is checked out to you automatically. While the document is checked out, other users can see that you are working on it, and they cannot make changes until you save and check it back in.
Saving works in two ways depending on what you want to do:
- Save (Ctrl+S): Saves your changes to the document in NetDocuments. This updates the existing document in place. It does not create a new version. The document remains checked out so you can continue working.
- Close and Check In: When you close the document, ndOffice checks it back in automatically. This releases the lock so other users can open and edit it.
Save As: Creating a New Document or New Version #
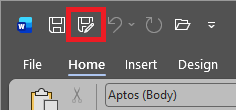
Save As in ndOffice serves two purposes: creating a brand new document in a workspace, or creating a new version of the current document. When you click Save As (either from the Quick Access Toolbar or from File > Save As), ndOffice opens the NetDocuments Save As dialog.
Creating a New Document #
To save as a new, separate document:
- Click Save As from the Quick Access Toolbar or go to File > Save As.
- In the Save As dialog, navigate to the workspace and folder where you want the new document saved.
- Fill out any required profile information (Client, Matter, Document Type, etc.) if applicable.
- Enter a file name and click Save.

This creates a brand new document in NetDocuments, completely separate from the original. The original document remains unchanged.
Save As is useful when you want to:
- Create a new document from a template for a specific client matter
- Copy a document from one workspace to another
- Save a local file into NetDocuments for the first time
Creating a New Version #
To create a new version of the document you are currently working on:
- Click Save As from the Quick Access Toolbar or go to File > Save As.
- In the Save As dialog, you will see Save as new version is automatically checked at the bottom of the window. The Official version checkbox will also be checked by default.
- You can optionally enter a Version name and Description to help identify this version later.
- Click Save.
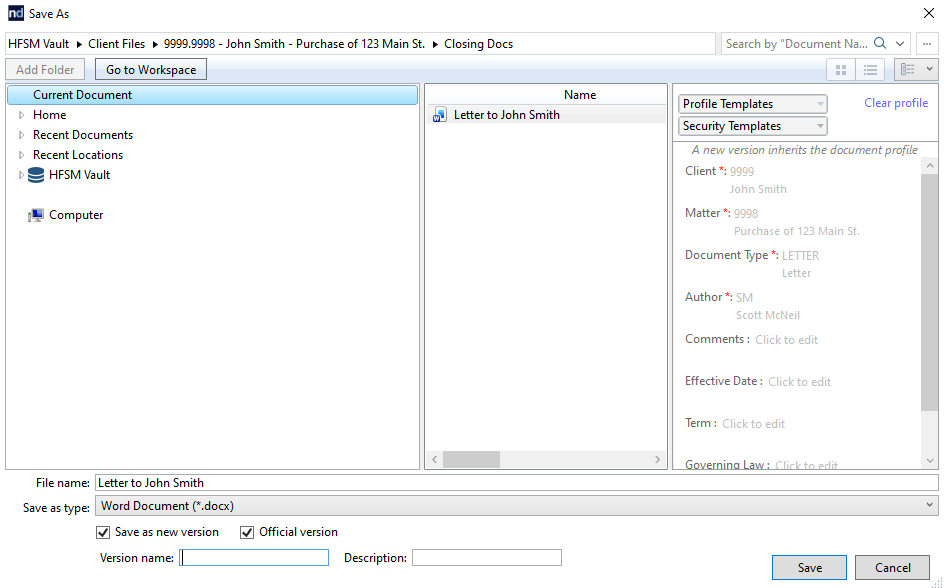
This saves your current changes as a new version of the same document. The version number increments automatically, and a complete copy of the previous version is preserved in the document’s version history.
Important: Using regular Save (Ctrl+S) does not create a new version. It simply updates the document in place. If you want to preserve a snapshot of the document at a specific point in time, use Save As to create a new version.
Understanding Version History #
Every time you create a new version using Save As, NetDocuments adds it to the document’s version history. This gives you a complete record of how the document has changed over time.
- Viewing Versions: You can view all previous versions of a document through the NetDocuments web interface. Go to the document’s properties and look for the Version History or Versions tab.
- Restoring a Previous Version: If you need to go back to an earlier version, you can open or restore it from the version history. This is useful if changes were made in error or if you need to reference what a document looked like at a specific point in time.
Official vs. Draft Versions #
NetDocuments distinguishes between two types of versions:
- Official Version: The published, approved version of the document. This is what other users see by default when they open the document. When you use Save As, the Official version checkbox is checked by default.
- Draft Version: A working copy that is not yet finalized. You can save multiple drafts without affecting the official version that others see. To save as a draft, uncheck the Official version checkbox in the Save As dialog.
Your firm’s administrator may configure whether draft versions are used. In many firms, every new version is saved as official. In others, lawyers work in draft mode and promote a version to official when it is ready.
Save As PDF #
ndOffice allows you to save a document directly as a PDF into NetDocuments. This is useful when you need to create a final, non-editable copy of a document for filing, sending to a client, or regulatory submission.
To save as PDF:
- Open the document in Word (or Excel or PowerPoint).
- Click File > Save As.
- In the Save As dialog, select your NetDocuments location.
- Change the Save as type dropdown from the default format to PDF.
- Choose the workspace and folder where you want the PDF saved.
- Click Save.
The PDF is saved as a separate document in NetDocuments with its own document profile. The original Word document remains unchanged.
You can also use File > Save as Adobe PDF if your firm has Adobe Acrobat installed. This gives you more control over PDF settings such as bookmarks, security, and compression. Either method saves the resulting PDF directly into NetDocuments through ndOffice.
Tips for Saving #
- Always let ndOffice handle the check-in. When you close a document, ndOffice checks it back in automatically. Avoid manually checking in through the web interface while the document is still open in Word, as this can cause sync issues.
- Do not save to your desktop or local drive. If you save a NetDocuments file to your local drive using a regular Save As, it breaks the connection to NetDocuments. That local copy is no longer managed by the DMS. Always save back to a NetDocuments location.
- Watch for the check-out indicator. ndOffice shows a small icon or status bar indicating whether a document is checked out to you. If you see that someone else has the document checked out, you can open a read-only copy but you will not be able to save changes until they check it back in.
- Use Save As for templates. If your firm stores document templates in NetDocuments, always use Save As to create a new copy in the correct client matter workspace. Never edit the template directly.
Saving Documents to NetDocuments with ndOffice
Category: Working with NetDocuments
Once ndOffice is installed and connected on your PC, saving documents to NetDocuments works directly from within Microsoft Word, Excel, and PowerPoint. You do not need to upload files through the web interface or drag them into a browser window. Everything happens from the familiar Save and Save As commands you already use.
How Saving Works with ndOffice #
When you open a document from NetDocuments using ndOffice, it is checked out to you automatically. While the document is checked out, other users can see that you are working on it, and they cannot make changes until you save and check it back in.
Saving works in two ways depending on what you want to do:
- Save (Ctrl+S): Saves your changes to the document in NetDocuments. This updates the existing document in place. It does not create a new version. The document remains checked out so you can continue working.
- Close and Check In: When you close the document, ndOffice checks it back in automatically. This releases the lock so other users can open and edit it.
Save As: Creating a New Document or New Version #
Save As in ndOffice serves two purposes: creating a brand new document in a workspace, or creating a new version of the current document. When you click Save As (either from the Quick Access Toolbar or from File > Save As), ndOffice opens the NetDocuments Save As dialog.
Creating a New Document #
To save as a new, separate document:
- Click Save As from the Quick Access Toolbar or go to File > Save As.
- In the Save As dialog, navigate to the workspace and folder where you want the new document saved.
- Fill out any required profile information (Client, Matter, Document Type, etc.) if applicable.
- Enter a file name and click Save.
This creates a brand new document in NetDocuments, completely separate from the original. The original document remains unchanged.
Save As is useful when you want to:
- Create a new document from a template for a specific client matter
- Copy a document from one workspace to another
- Save a local file into NetDocuments for the first time
Creating a New Version #
To create a new version of the document you are currently working on:
- Click Save As from the Quick Access Toolbar or go to File > Save As.
- In the Save As dialog, you will see Save as new version is automatically checked at the bottom of the window. The Official version checkbox will also be checked by default.
- You can optionally enter a Version name and Description to help identify this version later.
- Click Save.
This saves your current changes as a new version of the same document. The version number increments automatically, and a complete copy of the previous version is preserved in the document’s version history.
Important: Using regular Save (Ctrl+S) does not create a new version. It simply updates the document in place. If you want to preserve a snapshot of the document at a specific point in time, use Save As to create a new version.
Understanding Version History #
Every time you create a new version using Save As, NetDocuments adds it to the document’s version history. This gives you a complete record of how the document has changed over time.
- Viewing Versions: You can view all previous versions of a document through the NetDocuments web interface. Go to the document’s properties and look for the Version History or Versions tab.
- Restoring a Previous Version: If you need to go back to an earlier version, you can open or restore it from the version history. This is useful if changes were made in error or if you need to reference what a document looked like at a specific point in time.
Official vs. Draft Versions #
NetDocuments distinguishes between two types of versions:
- Official Version: The published, approved version of the document. This is what other users see by default when they open the document. When you use Save As, the Official version checkbox is checked by default.
- Draft Version: A working copy that is not yet finalized. You can save multiple drafts without affecting the official version that others see. To save as a draft, uncheck the Official version checkbox in the Save As dialog.
Your firm’s administrator may configure whether draft versions are used. In many firms, every new version is saved as official. In others, lawyers work in draft mode and promote a version to official when it is ready.
Save As PDF #
ndOffice allows you to save a document directly as a PDF into NetDocuments. This is useful when you need to create a final, non-editable copy of a document for filing, sending to a client, or regulatory submission.
To save as PDF:
- Open the document in Word (or Excel or PowerPoint).
- Click File > Save As.
- In the Save As dialog, select your NetDocuments location.
- Change the Save as type dropdown from the default format to PDF.
- Choose the workspace and folder where you want the PDF saved.
- Click Save.
The PDF is saved as a separate document in NetDocuments with its own document profile. The original Word document remains unchanged.
You can also use File > Save as Adobe PDF if your firm has Adobe Acrobat installed. This gives you more control over PDF settings such as bookmarks, security, and compression. Either method saves the resulting PDF directly into NetDocuments through ndOffice.
Tips for Saving #
- Always let ndOffice handle the check-in. When you close a document, ndOffice checks it back in automatically. Avoid manually checking in through the web interface while the document is still open in Word, as this can cause sync issues.
- Do not save to your desktop or local drive. If you save a NetDocuments file to your local drive using a regular Save As, it breaks the connection to NetDocuments. That local copy is no longer managed by the DMS. Always save back to a NetDocuments location.
- Watch for the check-out indicator. ndOffice shows a small icon or status bar indicating whether a document is checked out to you. If you see that someone else has the document checked out, you can open a read-only copy but you will not be able to save changes until they check it back in.
- Use Save As for templates. If your firm stores document templates in NetDocuments, always use Save As to create a new copy in the correct client matter workspace. Never edit the template directly.
Need help getting your team up and running on NetDocuments? HFSM Technology provides implementation, training, and ongoing support for Canadian law firms. Visit hfsm.ca/contact to learn more.


